
Get Verified on Bluesky Social With Your GoDaddy Domain
A step-by-step guide to verifying your GoDaddy domain with Bluesky Social


You may not have noticed yet, but it won't be long before Bluesky will be all over your social media feeds. Bluesky is a new social media platform that is currently in beta and invite only while they continue to refine the product.
What makes it different?
Bluesky is a federated social media platform, meaning that it is not owned by a single company, but rather a network of servers that are owned by different entities. This is a major departure from traditional social media companies because it means that you own your data, and you can choose which server you want to use.
One of the practical results of this federated model is you can verify yourself on Bluesky in just a few steps! To be verified on Bluesky means that you have proven you own a registered domain name. That seems simple, but most people on the web do not own their own website addresses, and even those that do, do not change the settings manually for their domain names very often.
In this blog post, we'll walk through how to verify yourself on Bluesky using GoDaddy as your domain registrar. If you don't have a domain name yet, you can buy one from GoDaddy, which is required for the next steps. I should also mention that I am not affiliated with GoDaddy in any way, I just happen to use them for a lot of my domain names (yes, I am one of those people that collects URLs!) and I used a domain name I have through GoDaddy for Bluesky verification.
tl;dr: You can follow the steps in this handy infographic below I put together without reading any of the next steps. If you need more detail though, please read on!

Step 1: Find your DNS Settings
The first thing you need to do is to find your DNS settings for the domain name you want to use for Bluesky verification.
To do that navigate to Accounts >> My Products in the GoDaddy menu. You should see a list of your domain names. Click on the Manage DNS link for the domain name you want to use for Bluesky verification.

You should now see a settings page to manage the DNS records for your domain name. You will need to add one new record to your domain address to be verified.
Step 2: Add A New DNS TXT Record
Now that you are on the settings page for your domain name, you need to add a new DNS record.
It might be a good time now to briefly explain what DNS records are. DNS stands for Domain Name System, and it is a system that translates domain names into IP addresses. When you type a domain name into your browser, your computer sends a request to a DNS server to find the IP address for that domain name. The DNS server then sends back the IP address for that domain name, and your computer can then connect to the server that is hosting that domain name. This is how your computer knows where to go when you type in a domain name.
DNS records are the individual pieces of information that make up a DNS server. There are many different types of DNS records, but the one we are interested in is the TXT record. A TXT record is a text record that can be used to store information about a domain name. This is the record we will be adding to our domain name to verify it on Bluesky.
First, click on the Add New Record button to add a new DNS record. This will open up a new form where you can add the new record. Follow the steps below to update this form correctly:
- Click on the TXT record type from the dropdown for the Type field.
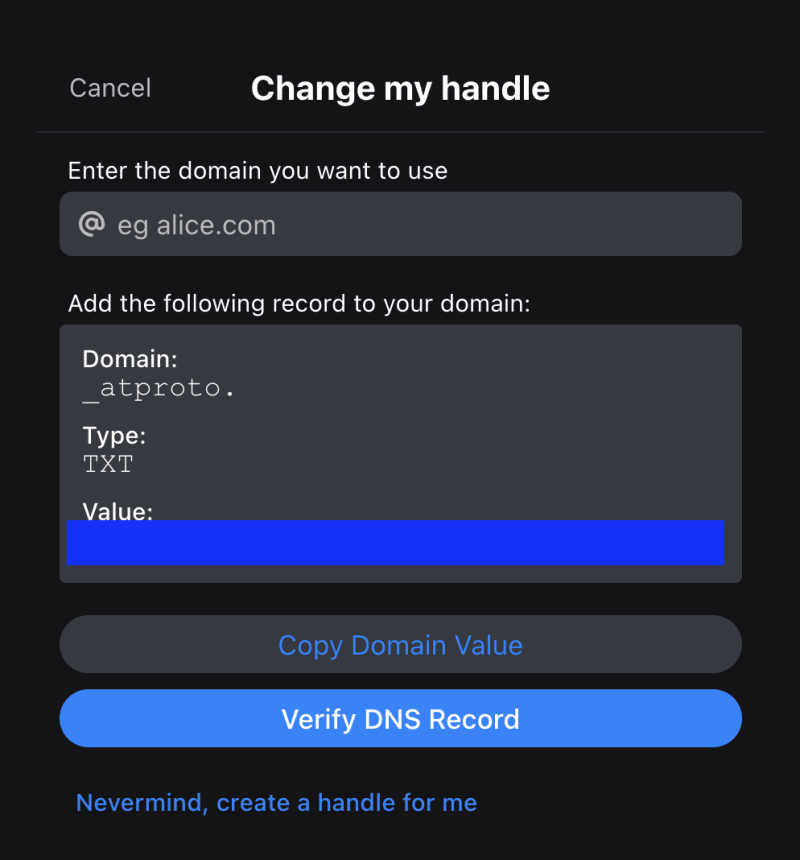
- Enter _atproto in the Name field.
- For the Data field, go to your Bluesky account settings and click Change my handle, then click I have my own domain and then copy the text shown from the Value field they provide and paste that into this form in the Data field.
- Click the Save button.
Step 3: Patience!
Now that you have added the new DNS record, you need to wait for the DNS servers to update. This can take up to 24 hours, but usually takes much less time than that. Once the DNS servers have updated, you can go back to your Bluesky account and click the Verify DNS Record button. Make sure you put the domain name in the top field before doing so.
That's it, you now have a verified Bluesky account! A bit less cumbersome than some of the more legacy social media platforms, right?